The trick with fermentation is to remember that you are a gardener, not a chef. A chef can control ingredients, preparation techniques, the heat of the pan, the length of cooking, the presentation of the meal. The gardener creates a set of conditions and waits to see what happens.
And sometimes this happens:
That's a "bloom." The conditions weren't quite right to make any mold/ fungal spores die off on their own. Garden failed this time. This is only the second "off" batch of anything I've made, and it's a good lesson to share.
Some people say that you can scrape off the top layer and eat the rest. I don't recommend doing that, because the filaments of the fungus can sink pretty deep. Yick. The cabbage will go in our compost heap, which eventually feeds our garden. The rest of the equipment will get washed in very hot soapy water before storage, and again before the next use.
What caused the bloom? I think there was too much "headspace," or too much distance between the cabbage and the top of the jar. More oxygen to be displaced by carbon dioxide means a longer period of time before anaerobic conditions are established. And anaerobic conditions are the key to tasty, consistent results. More on the science of lacto-fermentation next time!
"When we contemplate the whole globe as one great dewdrop, striped and dotted with continents and islands, flying through space with other stars all singing and shining together as one, the whole universe appears as an infinite storm of beauty." (John Muir, Travels in Alaska)
Showing posts with label recipe. Show all posts
Thursday, September 18, 2014
Monday, September 8, 2014
How to Make Real, Traditional Sauerkraut at Home
This post is for my Mums, who said she is interested in making sauerkraut. We make it all the time with consistently awesome results: salty, tangy, crunchy, tasty "cooked" cabbage that tingles your tongue and makes your tummy smile. Here's how.
This entire process can be summarized as follows:
1) Shred cabbage.
2) Add salt, vigorously.
3) Let it sit.
Any time this starts to feel complicated, refer to the simple process above. Everything else is just detail. Yes, there are a lot of pictures and words in this post, but hey, it's my blog and I'll write if I want to!
Every German hausfrau (housewife) making sauerkraut and every Korean uhmoni (mother) making kimchi will have their own recipe. This is how I do it, but don't be afraid to experiment to find what works in your kitchen. Fermenting food is like gardening. In our gardens, we create the conditions so veggies and flowers thrive, while weeds languish. In our kitchens, we create the conditions for certain bacteria to thrive in our food. The microbes do the cooking, not us.
Let's get started!
Ingredients
Clean up to reduce the number of bacteria that might contaminate your food or compete with the microbes you're cultivating. But not too clean - no antibaterial handwash, no chemicals on the countertops.
Wash your hands.
Wipe down your counters with a vinegar/water spray.
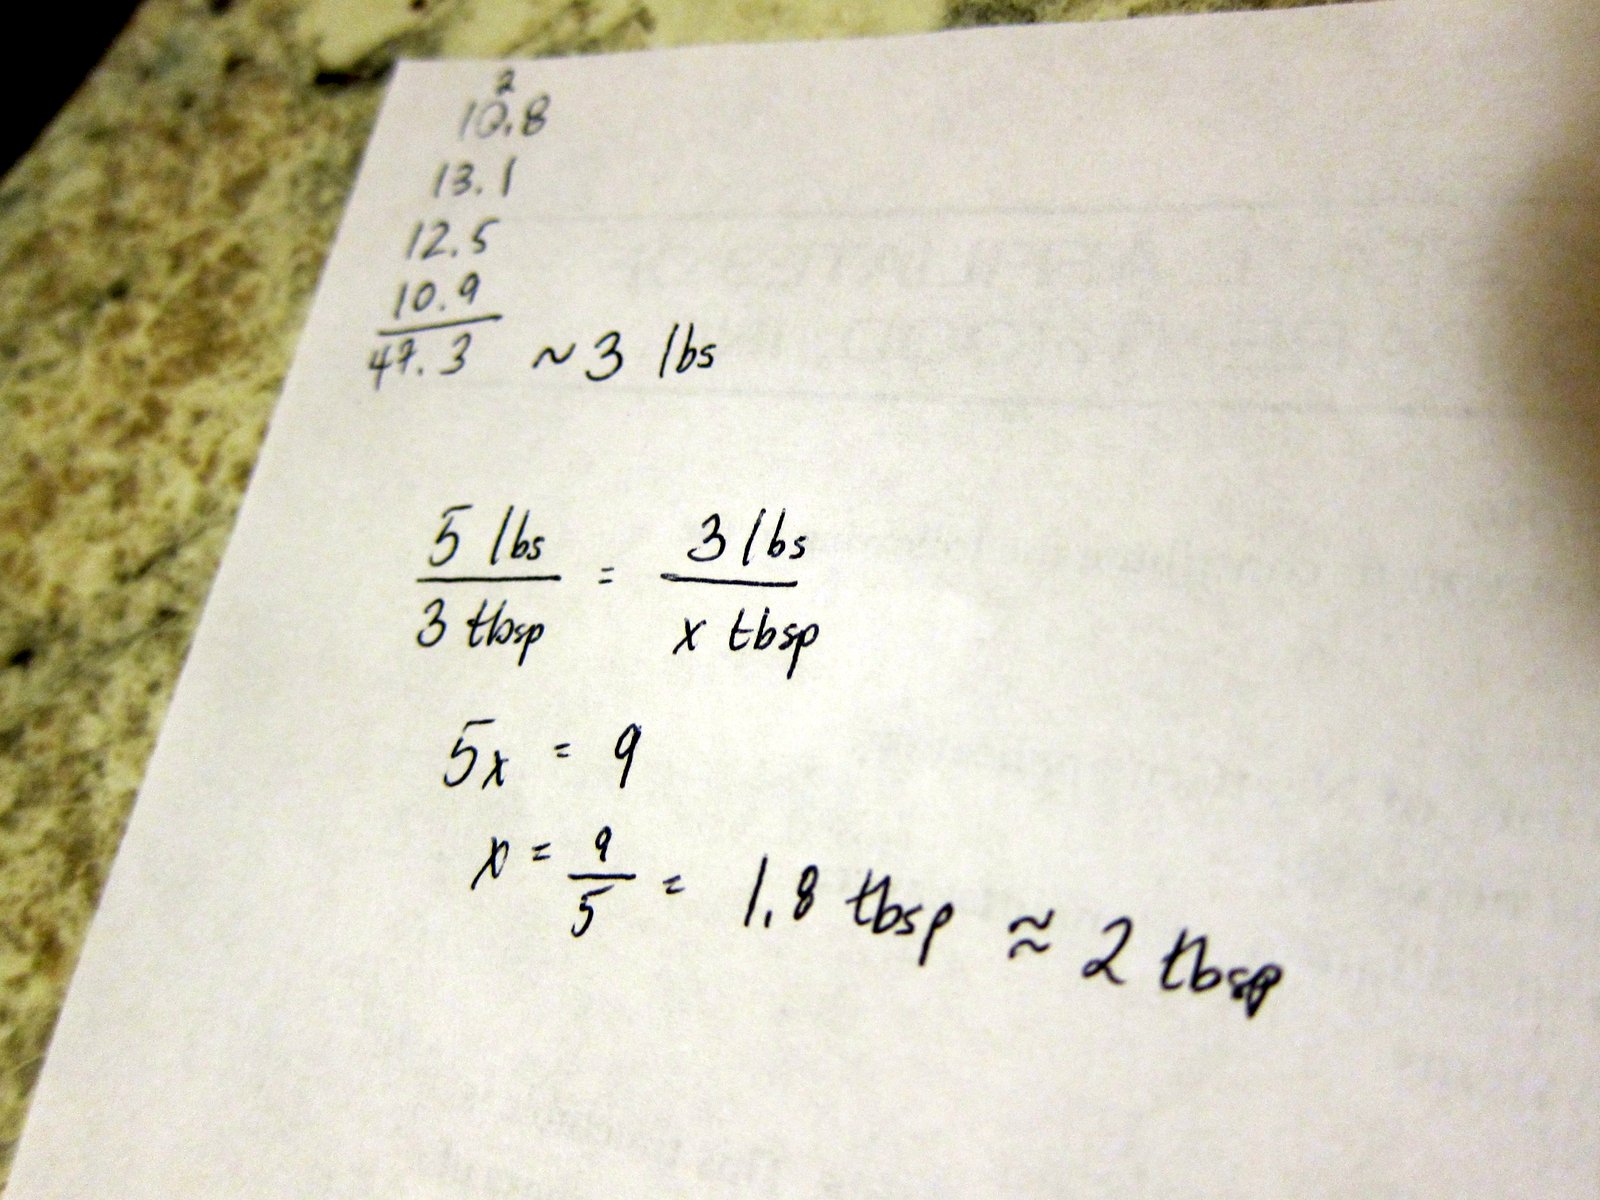
I recommend using ~4 lbs of cabbage, as that amount fits perfectly in a half gallon mason jar.
Step 3: Shred, Baby, Shred
Shred your cabbage.
I think slicing the quarters very very finely with a sharp knife makes sauerkraut with the best texture - nice n' crunchy.
But sometimes you get lazy and just want to finish with the food processor. Use the most coarse shredding attachment.
I like doing half-and-half. The sliced cabbage makes a great texture, and the processed cabbage makes a ton of brine. I wouldn't do it all in the food processor, due to texture concerns.
You could also use a mandolin, or if you can find that German hausfrau, ask to borrow her kraut board.
In the end, you'll have this:
Step 4: Salt It
Don't go too crazy with exact measurements. This is art, not science.
Sprinkle the salt over the shredded cabbage.
Step 5: Punch It
Mix the salt into the cabbage, thoroughly. While you're at it, punch down the cabbage, breaking and bruising it. This releases more brine, improving the fermentation conditions, and improves texture.
As you mix and punch, your cabbage will get limp and juicy as the plant cell walls break down and the salt draws out brine. Your cabbage now looks like this:
Step 6: Pack It
Use your optional canning funnel to pack the half gallon mason jar full of delicious salty cabbage.
After every few scoops, press down on the cabbage firmly, compressing it into the bottom of the jar, below the level of the brine. Press down again and again as you pack the jar.
In the end, you should have lots of cabbage packed into the bottom of the jar, with a nice layer of salty brine floating above it.
Take your vinegar rag and wipe down the rim, neck, and outside of the jar.
This airlock is a used wide-mouth mason jar lid, a piece of coat hanger, a small rubber stopper with a hole in it, and a short section of food-grade tubing.
Step 7: Wait
Put the mason jar in a corner where it will sit at room temperature, undisturbed, for about a week. Thereafter, you can keep it on the counter at room temperature (faster and easier) or continue its ferment in a cooler place, like a root cellar or the door of your fridge (slower and more traditional).
And here is where the magic begins! The fermentation process produces carbon dioxide, which pushes up the column of water in the airlock until bloop a little bubble of carbon dioxide escapes. If you don't see some blooping by day 2, your airlock probably has a leak - fix it ASAP. The blooping peaks around day 3-4, depending on temperature, and may continue as long as day 7. By the end of the first week, your kraut will have morphed from bright green to straw yellow.
Let your kraut sit for 3 weeks. DON'T open the airlock during that time! If you do, you will destroy the oxygen-free (anaerobic) environment you painstakingly created with your airlock and will encourage the growth of the not good bacteria and molds.
Many people like to ferment their kraut at least 10-12 weeks. When Dave worked on the farm, we had some ferments go even longer, and they were delicious. Now, I usually go about 3 weeks, because the kraut looks so darn tasty sitting on my counter.
At the end of the fermentation, screw on a regular mason jar lid and store the jar in the fridge.
---
I'm going to take pictures of the jar as it ferments. Exciting! Stay tuned for Part II: How and Why This Works (With Pictures!).
This entire process can be summarized as follows:
1) Shred cabbage.
2) Add salt, vigorously.
3) Let it sit.
Any time this starts to feel complicated, refer to the simple process above. Everything else is just detail. Yes, there are a lot of pictures and words in this post, but hey, it's my blog and I'll write if I want to!
Every German hausfrau (housewife) making sauerkraut and every Korean uhmoni (mother) making kimchi will have their own recipe. This is how I do it, but don't be afraid to experiment to find what works in your kitchen. Fermenting food is like gardening. In our gardens, we create the conditions so veggies and flowers thrive, while weeds languish. In our kitchens, we create the conditions for certain bacteria to thrive in our food. The microbes do the cooking, not us.
Let's get started!
Ingredients
- Roughly 4 lbs of cabbage
- Roughly 2.5 tablespoons of salt
I use green cabbage, but a Korean uhmoni will use Chinese cabbage. They're both fine. I've heard that red cabbage makes amazing kraut, too.
I use pickling salt, which is not iodized and does not have anti-caking agents. Regular ol' table salt works fine - no need to buy 5 lbs of canning salt.
Equipment
- A large bowl
- Cutting board
- Large knife
- 1 half-gallon mason jar
- 1 DIY airlock
The German hausfrau uses a very large mandolin in place of the knife and cutting board. Sometimes I'll use a food processor if I'm feeling lazy. More on that, plus the DIY airlock, later.
- Optional, recommended:
- Kitchen scale
- 1 canning funnel
- 1 cleaning rag and white vinegar
Clean up to reduce the number of bacteria that might contaminate your food or compete with the microbes you're cultivating. But not too clean - no antibaterial handwash, no chemicals on the countertops.
Wash your hands.
Wipe down your counters with a vinegar/water spray.
Good enough.
Step 2: Weigh Your Cabbage & Calculate Your Salt
Remove the outer leaves.
Chop into quarters and remove the core. Weigh each quarter, noting the total weight.
No kitchen scale? No problem. Weigh your cabbage at the grocery store. Write down the number. Reduce the salt in your recipe slightly, to account for the fact that you'll discard the core. Done!
I recommend using ~4 lbs of cabbage, as that amount fits perfectly in a half gallon mason jar.
Step 3: Shred, Baby, Shred
Shred your cabbage.
I think slicing the quarters very very finely with a sharp knife makes sauerkraut with the best texture - nice n' crunchy.
But sometimes you get lazy and just want to finish with the food processor. Use the most coarse shredding attachment.
I like doing half-and-half. The sliced cabbage makes a great texture, and the processed cabbage makes a ton of brine. I wouldn't do it all in the food processor, due to texture concerns.
You could also use a mandolin, or if you can find that German hausfrau, ask to borrow her kraut board.
In the end, you'll have this:
Step 4: Salt It
Figure out how much salt you'll need based on the magical ratio of 3 tablespoons of salt for every 5 pounds of cabbage, cores removed. Use algebra or this handy dandy chart:
- 1 lb cabbage = 1/2 tablespoon plus 1/3 teaspoon salt
- 2 lb cabbage = 1 tablespoon plus 1 teaspoon salt
- 3 lb cabbage = 1 tablespoon plus 2.5 teaspoon salt
- 4 lb cabbage = 2.5 tablespoon salt
- 5 lb cabbage = 3 tablespoon salt
Don't go too crazy with exact measurements. This is art, not science.
Sprinkle the salt over the shredded cabbage.
Step 5: Punch It
Mix the salt into the cabbage, thoroughly. While you're at it, punch down the cabbage, breaking and bruising it. This releases more brine, improving the fermentation conditions, and improves texture.
Step 6: Pack It
Use your optional canning funnel to pack the half gallon mason jar full of delicious salty cabbage.
After every few scoops, press down on the cabbage firmly, compressing it into the bottom of the jar, below the level of the brine. Press down again and again as you pack the jar.
In the end, you should have lots of cabbage packed into the bottom of the jar, with a nice layer of salty brine floating above it.
Take your vinegar rag and wipe down the rim, neck, and outside of the jar.
Add water to the fermentation airlock, about an inch on either side of the bottom of "U" shaped trap. Screw on the airlock using a wide-mouthed canning band.
This airlock is a used wide-mouth mason jar lid, a piece of coat hanger, a small rubber stopper with a hole in it, and a short section of food-grade tubing.
- Drill a hole with a large drill bit in the mason jar lid.
- Stuff in the rubber stopper, then stuff the tube into the stopper.
- Twist the tube in a loop and secure with wire.
- Add water to half the height of the loop.
Step 7: Wait
Put the mason jar in a corner where it will sit at room temperature, undisturbed, for about a week. Thereafter, you can keep it on the counter at room temperature (faster and easier) or continue its ferment in a cooler place, like a root cellar or the door of your fridge (slower and more traditional).
And here is where the magic begins! The fermentation process produces carbon dioxide, which pushes up the column of water in the airlock until bloop a little bubble of carbon dioxide escapes. If you don't see some blooping by day 2, your airlock probably has a leak - fix it ASAP. The blooping peaks around day 3-4, depending on temperature, and may continue as long as day 7. By the end of the first week, your kraut will have morphed from bright green to straw yellow.
Let your kraut sit for 3 weeks. DON'T open the airlock during that time! If you do, you will destroy the oxygen-free (anaerobic) environment you painstakingly created with your airlock and will encourage the growth of the not good bacteria and molds.
Many people like to ferment their kraut at least 10-12 weeks. When Dave worked on the farm, we had some ferments go even longer, and they were delicious. Now, I usually go about 3 weeks, because the kraut looks so darn tasty sitting on my counter.
At the end of the fermentation, screw on a regular mason jar lid and store the jar in the fridge.
---
I'm going to take pictures of the jar as it ferments. Exciting! Stay tuned for Part II: How and Why This Works (With Pictures!).
Wednesday, February 16, 2011
Two Great Backpacking Recipes
~2 packages instant noodles with flavor packet
~1-5 oz. can tuna in water
~1 avocado
~2 packets mayo
~2 packets mustard
~Optional: grated parmesan or shredded cheddar cheese
Break up the instant noodles inside the package. Pour into 2 bowls. Add between ¼ and ½ of a single flavor packet to each bowl (save the other to flavor something else). Add half of the tuna, including tuna water, to each bowl. Cut the avocado in half, remove stone, slice each half into small pieces inside the skin, and add to each bowl. Add a packet of mayo and a packet of mustard. Mix very well. Optionally, top with cheese. Serves 2.
~1 c. whole wheat couscous
~2 c. water
~1/4 c. raisins
~2 small apples or 1 medium apple
~1 tsp. cinnamon
~2 pinches salt
Bring water to a boil. Add to couscous, cover, let stand 5-10 minutes until couscous has more than doubled in size and water is absorbed. While couscous is rehydrating, chop apple into small bits. Mix together couscous, raisins, chopped apple, cinnamon, and salt. Serves 2.
Wednesday, December 15, 2010
Zeytinyağlı Yeşil Fasulye (Green Beans in Olive Oil)
I had this multiple times in Turkey, and I plan on making it when I return to the U.S.A. Maybe with a little less olive oil, though...
photo credit: www.resimliyemektariflerin.com
- 1/2 kg runner beans (or green beans)
- 1 onion, very finely chopped
- 2 cloves of garlic, roughly chopped
- 2 or 3 tomatoes, peeled and very finely chopped
- 1/2 c. olive oil (you read that right)
- 1/2 to 1 1/2 c. hot water
- Sugar and salt to taste
Clean the beans (remove top, tail, and string, if applicable). Chop into 2-3 inch segments.
Saute the onions and garlic until onions are turning clear. Add everything else, bring to a boil, reduce to a simmer. Cook until beans are soft but not mushy, 30 minutes to 1 hour, depending on the type of bean.
Remove from heat. Serve at room temperature.
(Apparently, this can be made in a pressure cooker, as well. Cook the beans about 15 minutes.)
Saute the onions and garlic until onions are turning clear. Add everything else, bring to a boil, reduce to a simmer. Cook until beans are soft but not mushy, 30 minutes to 1 hour, depending on the type of bean.
Remove from heat. Serve at room temperature.
(Apparently, this can be made in a pressure cooker, as well. Cook the beans about 15 minutes.)
Friday, September 24, 2010
Khmer Kitchen
Cambodian, or Khmer, cooking might not be as famous as its cousin to the west (Thai), but I like it even more.
The staple food is white rice, which is eaten at every meal (and which I hate). But there are many influences from abroad that blend together with a dash of Cambodian ingenuity into a fusion that's quite pleasing to the Western palate. From Cambodian's French colonial past, you'll find baguettes and strong coffee for breakfast. From Cambodia's cultural inheritance from India, you'll find delicious mild curries (kari). And there are plenty of noodle dishes and soups, due to Cambodia's links with China.
Khmer specific dishes include amok, made with thin strips of leafy greens, and samlor ktiss, a coconut curry soup. I like that chilis seem to be served on the side, so you can make the dish as hot as you want. The Khmer cooks I've chatted with seem to take a very loose, creative approach to their cooking. If they want to make their amok more like a curry, well, that's what they do. If they want to serve something with a creative sauce, it's on the menu. And this is in the restaurants where meals go for $1-3 dollars. Definitely not the standard fried noodles/ fried rice. Pretty neat.
We've been eating breakfast and lunch at Navy Kitchen, where a huge entree plus free rice, tea, and pineapple slices will set you back a whopping USD$2. It's located on this block (sorry, no street name or address, that's not a common thing in this town). Eat here. You'll thank me.
View Larger Map
Davo and I asked if "Ma" ever gave cooking lessons. Her surly but sweet 21 year old son, Bati, said sure. I inquired about a price, and he said, "Whatever you think." Gotta love informality.
So one afternoon, she let us into her cramped kitchen. The kitchen itself was about as dirty as you'd expect, but everything that touched food was surprisingly clean. And did I mention that the kitchen was tiny? With two tiny Cambodians and two enormous Westerners, we were tripping over each other. Ma is fast in the kitchen, and we were always in the way.
Also, I need a lesson in the proper way to stir soup.
It was a fun little demonstration. Ma deemed my effort at hot and sour soup "eh." But I was proud.
Ingredients:
In a little pan, heat up the water to a boil with the boullion, garlic, ginger, and galangal. Add onion and carrot, cook for a minute. Add tomato, pineapple, leafy greens, stir for a minute. Add juice of limes, egg, sugar, salt, tamarind paste, and chili. Cook for a few more minutes. Add the garlic as a garnish. Simple!
The staple food is white rice, which is eaten at every meal (and which I hate). But there are many influences from abroad that blend together with a dash of Cambodian ingenuity into a fusion that's quite pleasing to the Western palate. From Cambodian's French colonial past, you'll find baguettes and strong coffee for breakfast. From Cambodia's cultural inheritance from India, you'll find delicious mild curries (kari). And there are plenty of noodle dishes and soups, due to Cambodia's links with China.
Khmer specific dishes include amok, made with thin strips of leafy greens, and samlor ktiss, a coconut curry soup. I like that chilis seem to be served on the side, so you can make the dish as hot as you want. The Khmer cooks I've chatted with seem to take a very loose, creative approach to their cooking. If they want to make their amok more like a curry, well, that's what they do. If they want to serve something with a creative sauce, it's on the menu. And this is in the restaurants where meals go for $1-3 dollars. Definitely not the standard fried noodles/ fried rice. Pretty neat.
We've been eating breakfast and lunch at Navy Kitchen, where a huge entree plus free rice, tea, and pineapple slices will set you back a whopping USD$2. It's located on this block (sorry, no street name or address, that's not a common thing in this town). Eat here. You'll thank me.
View Larger Map
Davo and I asked if "Ma" ever gave cooking lessons. Her surly but sweet 21 year old son, Bati, said sure. I inquired about a price, and he said, "Whatever you think." Gotta love informality.
So one afternoon, she let us into her cramped kitchen. The kitchen itself was about as dirty as you'd expect, but everything that touched food was surprisingly clean. And did I mention that the kitchen was tiny? With two tiny Cambodians and two enormous Westerners, we were tripping over each other. Ma is fast in the kitchen, and we were always in the way.
It was a fun little demonstration. Ma deemed my effort at hot and sour soup "eh." But I was proud.
Cambodian Hot & Sour Soup
Ingredients:
- ~1.5 cup water
- ~1/2 boullion cube
- 1 clove garlic, smashed
- 1 in. piece of galangal, smashed
- a few small pieces of ginger, julienned
- handful of onion pieces
- handful of carrot pieces
- handful of tomato pieces
- handful of pineapple pieces
- handful of shredded dark leafy green
- juice of 2 keffir limes
- 1 egg
- big spoon of sugar
- salt, to taste
- chili, if you want
- tamarind paste, as much as you want
- as a garnish, minced garlic fried in oil until brown
In a little pan, heat up the water to a boil with the boullion, garlic, ginger, and galangal. Add onion and carrot, cook for a minute. Add tomato, pineapple, leafy greens, stir for a minute. Add juice of limes, egg, sugar, salt, tamarind paste, and chili. Cook for a few more minutes. Add the garlic as a garnish. Simple!
Tuesday, July 6, 2010
The Best Brownie Recipe
I made these brownies our last evening in Tuateawa. I've been meaning to post this recipe for a week--don't want to loose it--it's a keeper!
Ingredients:
1/2 cup butter
1 cup white sugar
2 eggs
1 teaspoon vanilla extract
1/3 cup unsweetened cocoa powder
1/2 cup all-purpose flour
1/4 teaspoon salt
1/4 teaspoon baking powder
optional: 1/4 c. chocolate chips.
Melt butter in a saucepan, then beat in sugar, eggs, and vanilla. Beat in the cocoa powder, flour, salt, and baking powder. Spread into a buttered, greased 8x8'' pan. Optionally, sprinkle chocolate chips on top. Bake in a preheated 350F/ 175C oven for 25-30 minutes.
Sunday, June 27, 2010
Lemon Poppyseed Cookies
Ingredients:
1/2 c. soft butter
3/4 c. (packed) brown sugar
2 eggs, beaten
1 t. vanilla extract
1-2 t. lemon rind
1/3 c. poppyseeds
2 c. whole wheat flour
2 t. baking powder
1/4 t. salt
Method:
Cream together butter and sugar, beating until light. Add eggs and vanilla, and beat well. Finally, add lemon rind and poppyseeds, and beat well again. Sift together dry ingredients. Add to wet ingredients and mix carefully with a spatula until just barely mixed. Don't over-mix, or the cookies will be tough instead of flaky.
Preheat the oven to 190 C/ 375 F. Spoon 1 tablespoon drops onto a lightly greased cookie sheet. The cookies do not spread much, so either flatten the dough into drops for flatter cookies, or leave in drops for thicker cookies. Bake ~10 minutes, less if the cookies are flat, or until the cookies are starting to become lightly browned.
Sunday, May 2, 2010
Bexie's Vegetarian Mushroom Gravy
I don't really like potatoes... unless they're smothered in this gravy. Rock on.
- 1/2 onion
- 1/2 c. diced mushrooms
- 2 T. oil
- 2 c. vege broth or water
- 3 T. nutritional yeast
- 1 vege bouillon cube
- 1/2 t. onion powder
- 1/2 t. garlic salt
- ~3 T. flour
Saute onions and mushrooms in oil until soft, 2-3 mintues. Add remaining ingredients, except flour, and bring to a simmer, stirring frequently. Slowly add flour, 1 tablespoon at a time, and whisk thoroughly to combine. Continue adding flour until gravy reaches desired thickness.
Sunday, April 11, 2010
Orange Goodness Lentil Loaf with Sweet Beet Sauce
Orange Goodness Lentil Loaf
i made this recipe up, combining lots of lovely orange colored ingredients.
makes 2 loaves, serving 6 hungry gnomes and 2 hungry ogres
- 3 onions
- 5 cloves garlic
- olive oil
- 3 large carrots, shredded
- 2 medium kumara or yams, shredded
- 3 cups red lentils
- 4 cups water
- 2 eggs, beaten
- 1/2 c. + 1/4 c. breadcrumbs
- dill, coriander, mixed herbs, salt, pepper
Saute the onions for a few minutes in olive oil, then add the garlic. When the onions are translucent, add the carrots and kumara/ yams and cook covered for ~10 minutes, stirring occasionally, until the veggies start to wilt. Add lentils, water, and spices; bring to a boil; then reduce to a simmer. Stir occasionally to mix the lentils into the veggies and cook until the water is absorbed and the lentils are soft and falling apart. Mix 1/4 c. bread crumbs and 2 beaten eggs into the veggie mix, spoon into 2 greased loaf pans, and bake at 175 C/ 350 F for ~30 minutes.
Blend all ingredients until smooth. Serve chilled or warm.
Sweet Beet Sauce
in a fit of culinary inspiration, i threw together this sweet beet sauce to accompany the lentil loaves. this made just enough for 8 hungry gnomes and ogres.
- 1 can beetroot
- 1-2 tsp. white vinegar
- 2 tbs. tomato puree, paste, or ketchup
- allspice, garlic powder, chili powder
Wednesday, April 7, 2010
Earthwise Valley Pancakes
pancakes from food team b's last cooking day
- 2 1/2 cups whole wheat flour
- 1/2 cup cornmeal
- 2 tablespoons + 1 teaspoon baking powder
- 2 teaspoons salt
- 2 tablespoons raw sugar
- 2 1/2 cups cow/ soy/ rice milk
- 2 eggs
- 1/4 cup + 2 tablespoons butter, melted
Mix together flour, cornmeal, baking powder, salt, and sugar. In a separate bowl, melt butter, then beat in eggs and milk. Pour wet ingredients into dry ingredients and mix until barely blended (there should be small pockets of dry ingredient in the batter). Drop ~1/4 cup of batter onto a hot, greased pan over medium heat. When the edges of the pancake start to look dry, flip over. Keep pancakes warm until ready to eat. Serve with butter and blackberry sauce.
Makes about 16 pancakes, serving six gnomes and two ogres.
Tuesday, March 2, 2010
Pita Bread
I'm on food team tomorrow; I'm planning on making homemade hummus with homemade pita bread, and I've got some sprouts started as well. This is my first time sprouting (don't really like sprouts; maybe they're better when they're very fresh) and my first time making pita bread. I made the pita bread today, and they turned out so well. It was so easy!
Homemade Pita Bread
Makes 16 breads
Ingredients:
If using active dry yeast, "wake up" the yeast by mixing it with the water and sugar and waiting ~10 minutes, until frothy. Otherwise, mix dry ingredients, and then add wet ingredients. Mix with a wooden spoon, and then your hands. The flour should all be incorporated and the dough should not be sticky. Knead for at least 10 minutes. Lightly coat the dough in olive oil, place in a large bowl, and cover with a kitchen cloth. Allow the dough to rise until it's doubled in size (it took three hours for my dough to rise).
Preheat the oven to really freaking hot. At least 400 degrees, 500 degrees if your oven goes that high. Also heat up your baking surface (cookie sheet, baking stone). Punch down the dough. Separate into 16 same-sized balls. Allow the dough to relax for 10-20 minutes. Roll out the dough balls with a rolling pin to ~1/4 inch thickness on a floured surface. Bake in batches until puffy, 3-8 minutes.
Homemade Pita Bread
Makes 16 breads
Ingredients:
- 4 tsp. yeast
- 2 tbs. sugar (or honey)
- 2 1/2 c. cups lukewarm water
- 6 cups whole wheat flour
- 3 tsp. salt
- 2 tbs. olive oil
If using active dry yeast, "wake up" the yeast by mixing it with the water and sugar and waiting ~10 minutes, until frothy. Otherwise, mix dry ingredients, and then add wet ingredients. Mix with a wooden spoon, and then your hands. The flour should all be incorporated and the dough should not be sticky. Knead for at least 10 minutes. Lightly coat the dough in olive oil, place in a large bowl, and cover with a kitchen cloth. Allow the dough to rise until it's doubled in size (it took three hours for my dough to rise).
Preheat the oven to really freaking hot. At least 400 degrees, 500 degrees if your oven goes that high. Also heat up your baking surface (cookie sheet, baking stone). Punch down the dough. Separate into 16 same-sized balls. Allow the dough to relax for 10-20 minutes. Roll out the dough balls with a rolling pin to ~1/4 inch thickness on a floured surface. Bake in batches until puffy, 3-8 minutes.
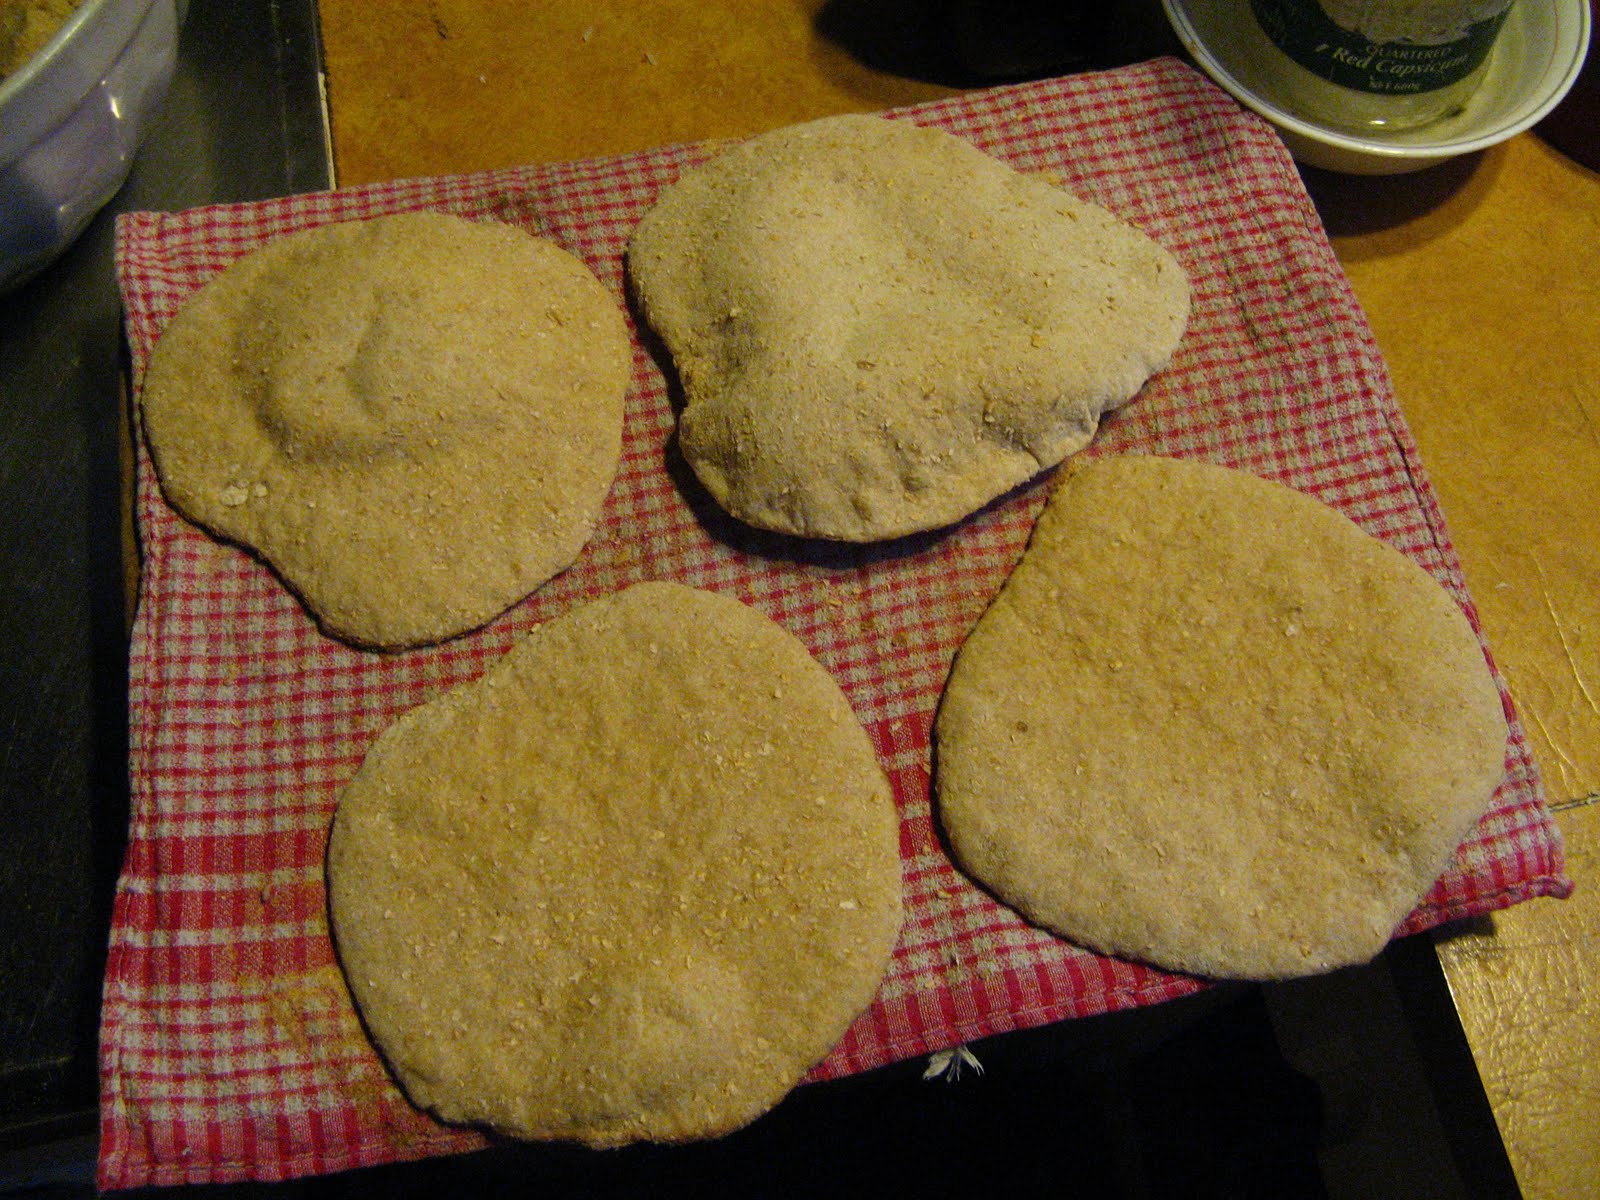
My first four pitas. Only two puffed up... later batches were more successful!
Hints for puffy pitas:- Make sure your oven is really freaking hot.
- Don't open the oven door while they're baking. The steam in the bread will help the breads puff up.
- Don't roll out the breads too thinly. If they're too thin, they won't puff up.
Friday, January 22, 2010
Blueberry Buckle
My parents' backyard in South Jersey isn't really a yard--it's a few acres of wild blueberry bushes.
This past July, I picked about 2.5 gallons of wild blueberries. That's alotta blueberries!
After six months, I still had about a gallon of frozen blueberries left. Blueberry cornmeal waffles and blueberry tea just wasn't going through them quickly enough.
Enter stage left: Blueberry Buckle, the best dessert on the planet.
Click the link below for the recipe. Yummmmm...
This past July, I picked about 2.5 gallons of wild blueberries. That's alotta blueberries!
After six months, I still had about a gallon of frozen blueberries left. Blueberry cornmeal waffles and blueberry tea just wasn't going through them quickly enough.
Enter stage left: Blueberry Buckle, the best dessert on the planet.
Click the link below for the recipe. Yummmmm...
Thursday, October 15, 2009
Bread!
Nothing beats the smell of bread baking in the oven, especially on the first night with a forecast for ice and snow.

My Bread Recipe
Combine 2 c. bread flour, 2 c. hot water, 2 T. sugar (brown sugar, honey), 2 T. oil, 2 t. salt, and 3 packets of Fleischmann's Rapid Rise yeast. Stir it up and let it sit 8-10 minutes to let the yeast wake up.
Add another 3 c. bread flour, adding a cup at a time, stirring and kneading until all of the flour is worked in. Knead for 5-10 minutes until the dough is elastic. Let the dough rise in a warm location for an hour.
Beat the hell out of the dough. Slap it down, punch it, beat it up. Then, shape the dough into one or more loaves and place them on a glass 9x13'' pan sprinkled with lots of cornmeal. Bake in a 350 degree oven for 25 minutes.
My Bread Recipe
Combine 2 c. bread flour, 2 c. hot water, 2 T. sugar (brown sugar, honey), 2 T. oil, 2 t. salt, and 3 packets of Fleischmann's Rapid Rise yeast. Stir it up and let it sit 8-10 minutes to let the yeast wake up.
Add another 3 c. bread flour, adding a cup at a time, stirring and kneading until all of the flour is worked in. Knead for 5-10 minutes until the dough is elastic. Let the dough rise in a warm location for an hour.
Beat the hell out of the dough. Slap it down, punch it, beat it up. Then, shape the dough into one or more loaves and place them on a glass 9x13'' pan sprinkled with lots of cornmeal. Bake in a 350 degree oven for 25 minutes.
Subscribe to:
Posts (Atom)